First of all, we will get acquainted with all the necessary things and methods we can use when drawing a portrait.
What we'll need:
PAPERS:
pastel paper
white paper for pencil drawing
PENCILS:
natural charcoal
HB, 2B, 4B, 6B and 8B pencils
Micropencil
ACCESSORIES:
Plastic eraser
pencil sharpener
OPTIONAL:
knife
trowel
pencil extension
Methods used:
The grid method: the grid method has been around for hundreds of years (some even claim that the ancient Egyptians came up with it), but it was most popular during the Italian Renaissance. It’s a simple technique – you place a grid on the subject, draw the same grid on a chosen sheet of paper, and then proceed field by field. This method is often taught as an alternative to the tracing method, to which it is considered superior because you are redrawing to scale with your own hand.
Drawing method: you might be surprised how many famous artists use some form of tracing or projection in their work. As far back as Leonardo da Vinci’s time, artists used the camera obscura – which uses light and mirrors to transmit images. Many professional artists and illustrators use this method to save time. Obscuring is simply one method of achieving a desired goal. It is up to you to decide if it is right for you. I personally don’t use this method, but it certainly doesn’t hurt to know about this option.
Sketching by hand: In an ideal world, everyone would be able to draw by hand. Drawing by hand means without tools and without clues. Most of the time, you progress from general to detailed, and you create any auxiliary lines yourself during the sketching process. Being able to draw by hand is a goal for almost everyone. Not only is it considered the ultimate form of drawing technique, but this method opens up endless possibilities for the artist. In fact, you can draw anything by hand at any time. This method is considered by many to be the purest form of drawing. Getting started can be very frustrating and it may take some time to fully master this method.
2. Basic facial proportions
ánfas
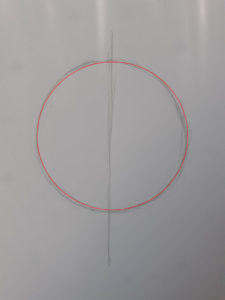
1. First we draw an ordinary circle (skull).
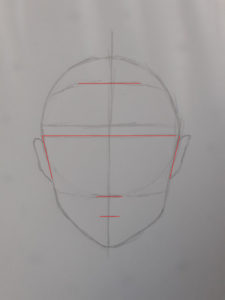
2. Add a top line to the circle to represent the place where we will later draw the eyebrows and draw the cheeks on both sides.
3. Mark the bottom of the circle as the place for drawing the nose. About halfway between the nose and the chin, draw a place for the mouth, at the same time place the ears so that they are between the line for the eyes and the line for the nose and draw a place for the beginning of the hair.
4. Now determine the width of all the pre-drawn elements.
The mouth will be slightly wider than the width of the nose. The width of the nose should determine the start of both eyes. The eyebrows will be approximately 1/3 longer than the overall width of the eyes.
5. All the previous steps allow us to place the face elements. We will show how to draw the different parts of the face in the paragraph below.
3. Drawing individual parts of the face
Eyes: It is very important to understand the basic structure of the eye. The eyes are very important and are also related to some of the most common mistakes in portrait drawing. These two lessons will help you avoid pitfalls when drawing the eye.
The eye is like any other object, it has a shape and shadows appear on its surface. It needs to be captured, including its volume.
The whites of the eyes are almost never pure white. The shade corresponds to about 10 to 20% on the gray scale, depending on the lighting.
Nose: The nose is one of the most interesting features of the face. Drawing it can be difficult for many people because it is made up of a series of interlocking surfaces that are bent in different ways. For this reason it is also a good idea to be careful about the spatial representation of the nose.
A common mistake here is to draw the places where the light hits too prominently or too conspicuously.
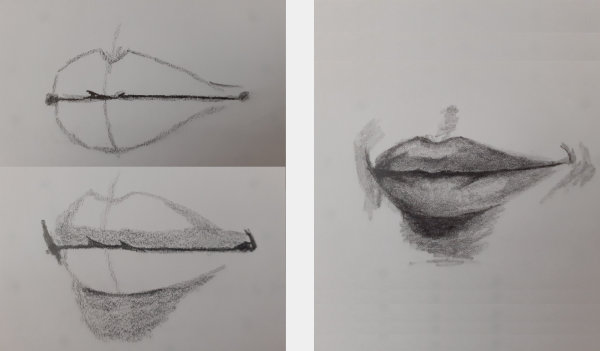
Mouth: the mouth is the most unusual element in the human face (especially the lips) and the most difficult to paint correctly (especially the teeth). What strikes us about the mouth at first sight are the lips.
Avoid too bright white (teeth) and pay attention to their contours.
Ears: We don’t pay much attention to them in everyday life and they are often neglected when drawing a portrait. It is important to learn how to draw ears, even if they may not be the focal point of the portrait.
When drawing ears, it helps a lot to simplify the individual shapes and recognise what forms their basis.
Hair: Hair can be drawn as the most prominent element of our portrait. Hair should be relatively simple to draw, small mistakes are easily lost in it. But even if you manage to draw them largely error-free, few people will notice.
Hair should be fairly simple to capture – a basic shape, a few highlights, and a few randomly placed strands.
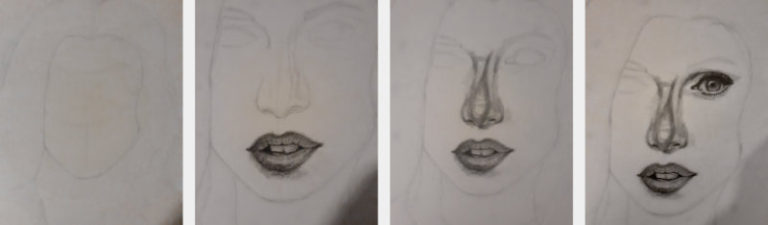
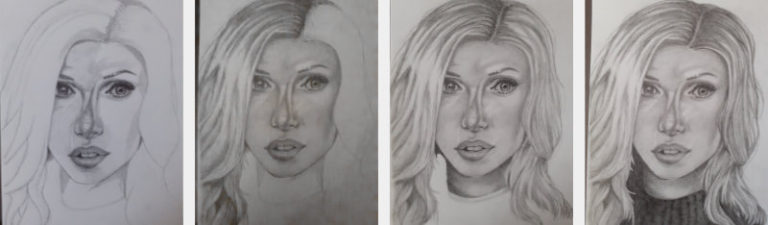
4. Example
Now that we know how to correctly draw the proportions of the face and how to draw all its different parts, we can try to draw a portrait from A to Z.